
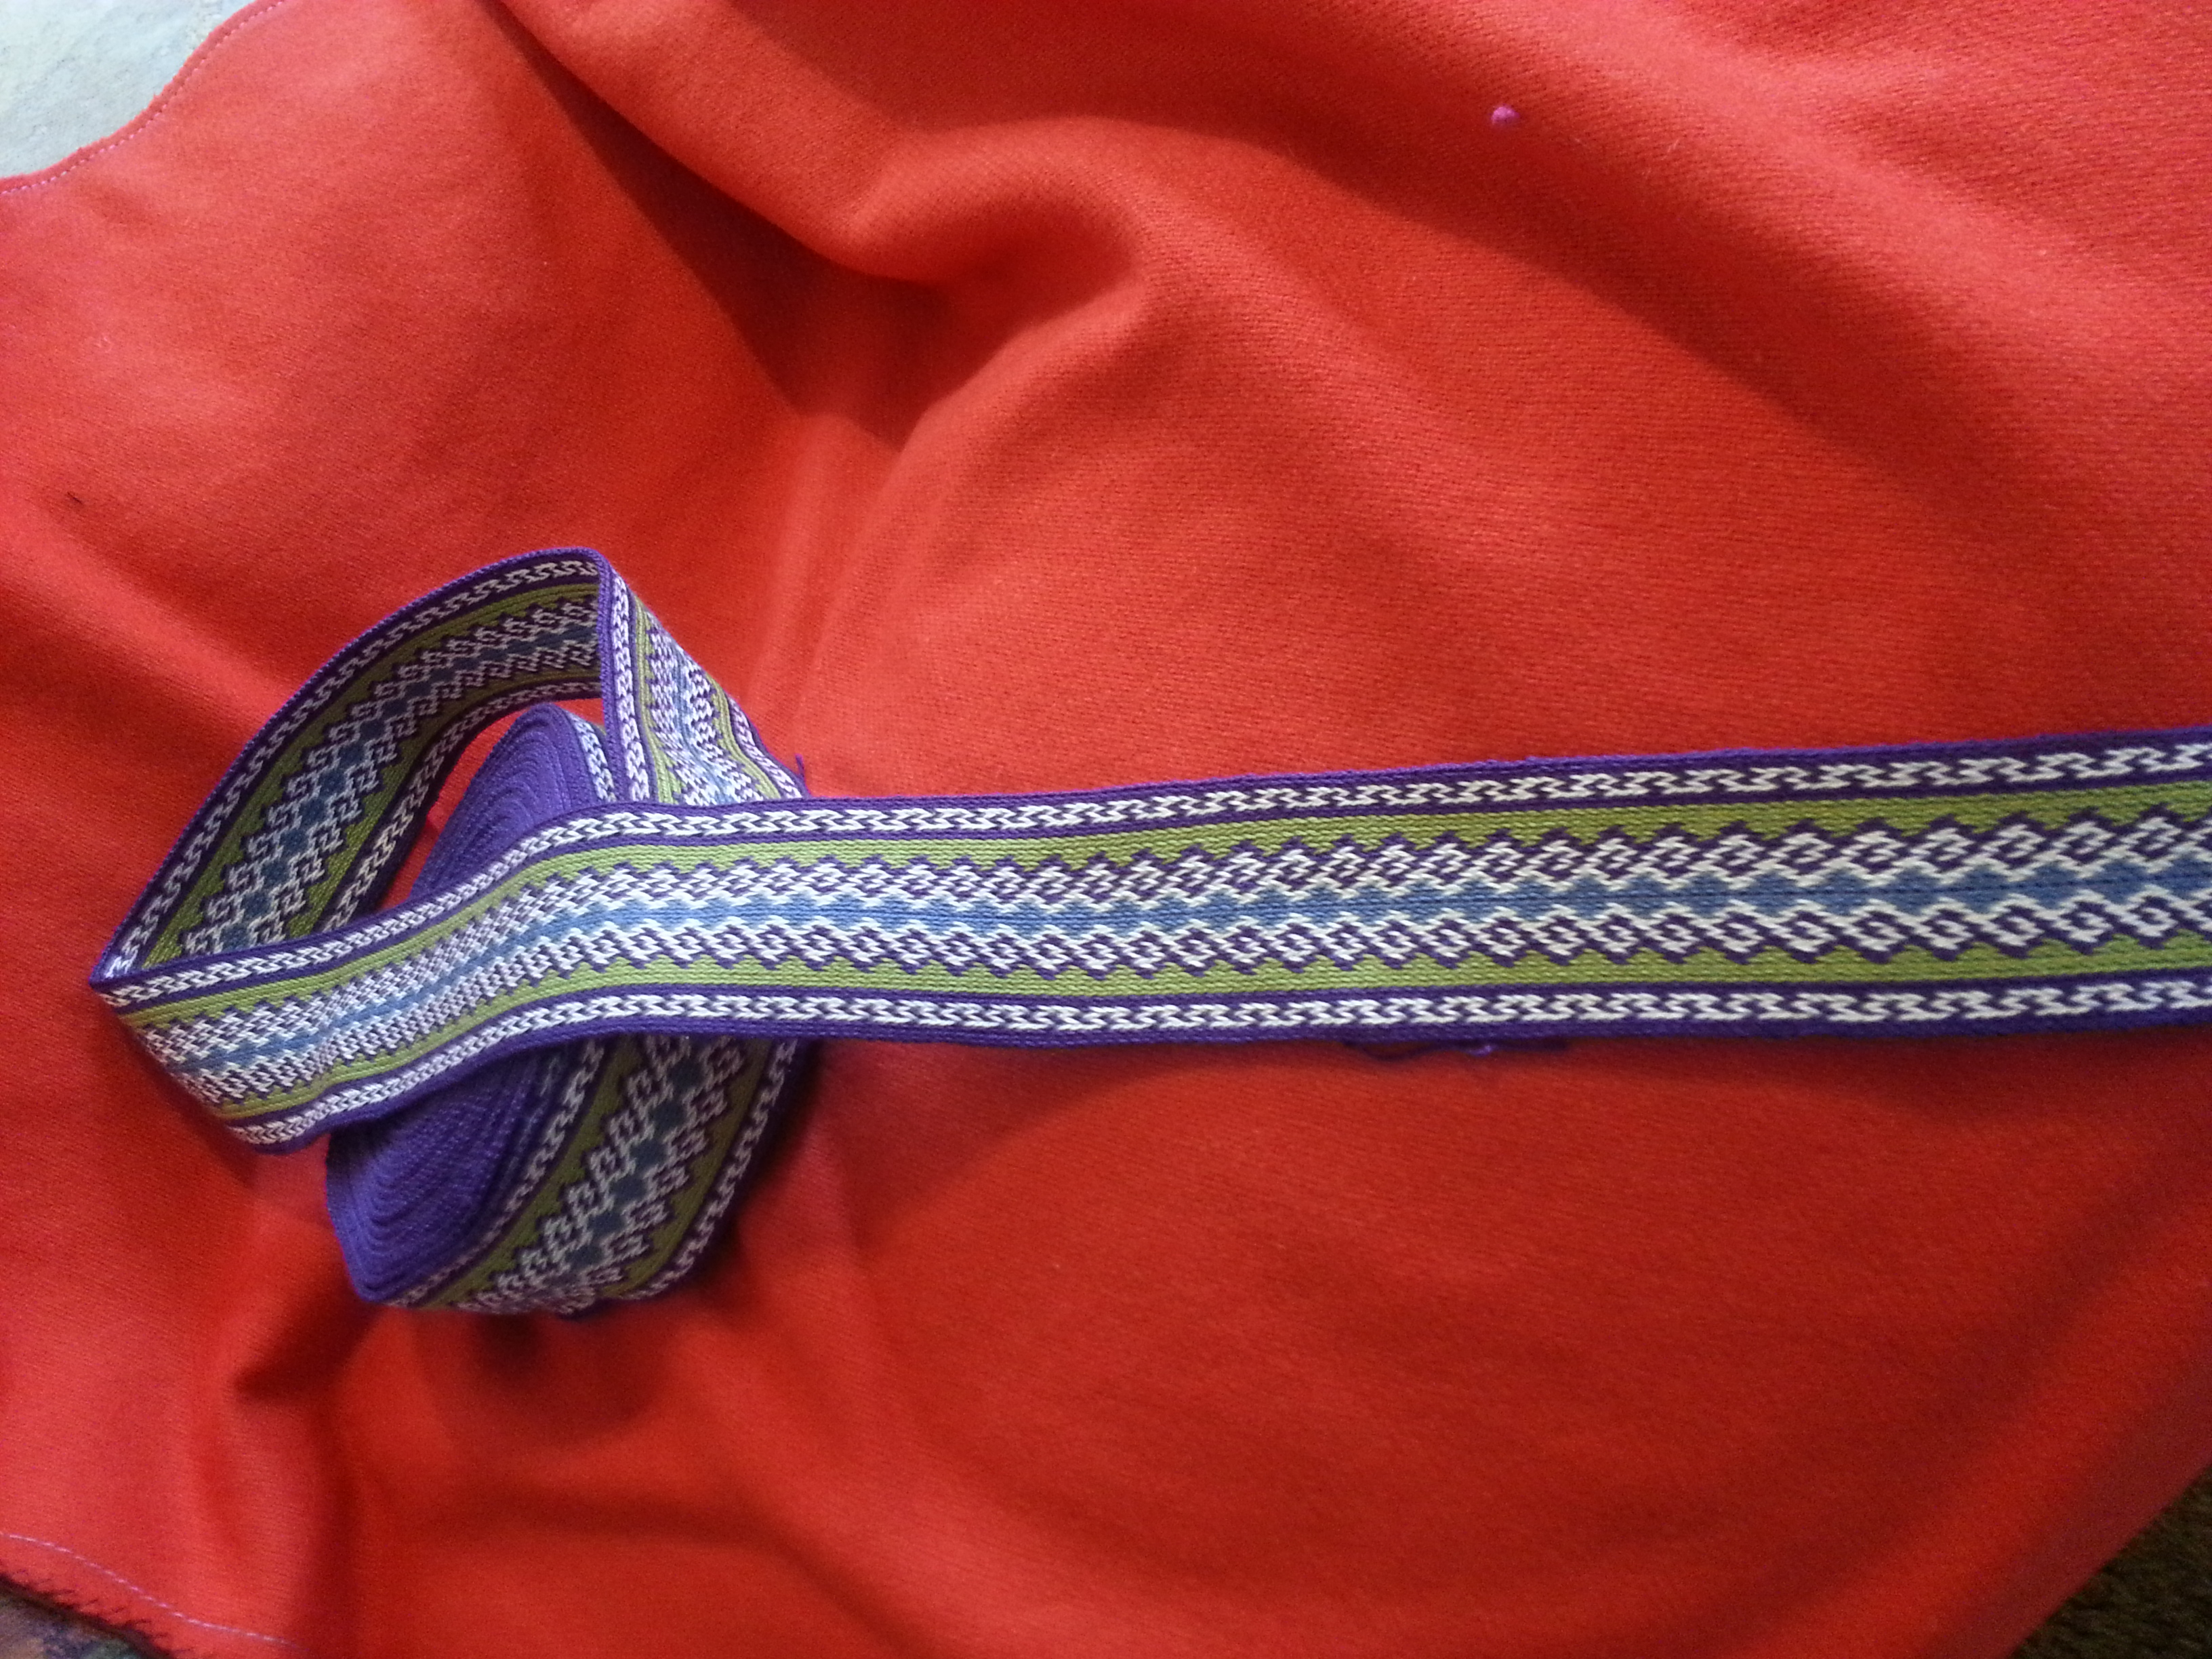
The rams horn motif as the central part of a wider silk band.
Background:
I created this pattern for Kolskegg Shieldbreakers Knighting coat. The pattern given here is for just the central motif, not the entire band as seen on his coat.
This pattern is based on a band found in St. John’s Cricket Field, Cambridge. This band was described by Grace Crowfoot as being made from a bast fiber, originally dyed blue with white and darker blue patterning. The band was likely preserved by metallic salts from a strap end it was attached to.
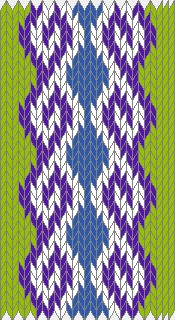
Rams Horn Pattern
The find was originally dated as Saxon, but this is now disputed. Penelope Walton Rogers suspects that this strap end is more likely a medieval find due to the location it was discovered. The pack idling style of tablet weaving is often found on medieval girdles. It is not found in any other Saxon finds to my knowledge.
When starting this project I was unaware that the find was disputed, and interpreted it as Saxon. A Viking could possibly have traded or raided for Saxon trim. Many of the Viking bands from the archaeological record are brocaded tablet weave, which I find slow to create. For Kolskegg’s coat I needed a trim that I could finish on a tight deadline. It had to be durable and appropriate for a Viking persona. I chose the pack idling style because I feel it weaves up faster and is less prone to snagging than brocaded bands, while still being plausible for a Viking persona.
This weaving structure is often referred to on the internet as “Anglo-Saxon” style, but given that the find is disputed I have gone with the more neutral label “pack idling”. Pack idling refers to the weaving method, where the cards are split into two packs. With each successive pick one pack is idle, and one pack is turned to make the new shed. This as opposed to regular tablet weaving, where all the cards are turned on every pick.
Pack idling weaves produce patterns with jagged edges that are characteristic of the weave structure. The pattern shows on both the front and the back of the band, and weaves up thicker and narrower than traditional tablet weave structures. I used 2/20 silk and packed the weft gently to get a softer trim suitable for a coat.
This is an advanced tablet weaving pattern. This pattern relies on exact threading of the tablets, and a precise turning pattern, while handling two packs of weaving cards. If you are new to tablet weaving I strongly recommend starting with a simpler pattern and comprehensive instructions, like this tutorial, before attempting a complex pattern such as this one.
I designed this pattern using a program called Guntram’s Tabletweaving Thingy (GTT), which is available on Guntram’s website for free. My rams horn pattern was inspired by Guntram’s own pack idling patterns. He refers to these patterns as Anglo-Saxon, and they are available on his website. Guntram’s patterns helped me see that this technique was capable of doing more than simple diamonds. It can generate ropes, braids, and knotwork fairly easily.
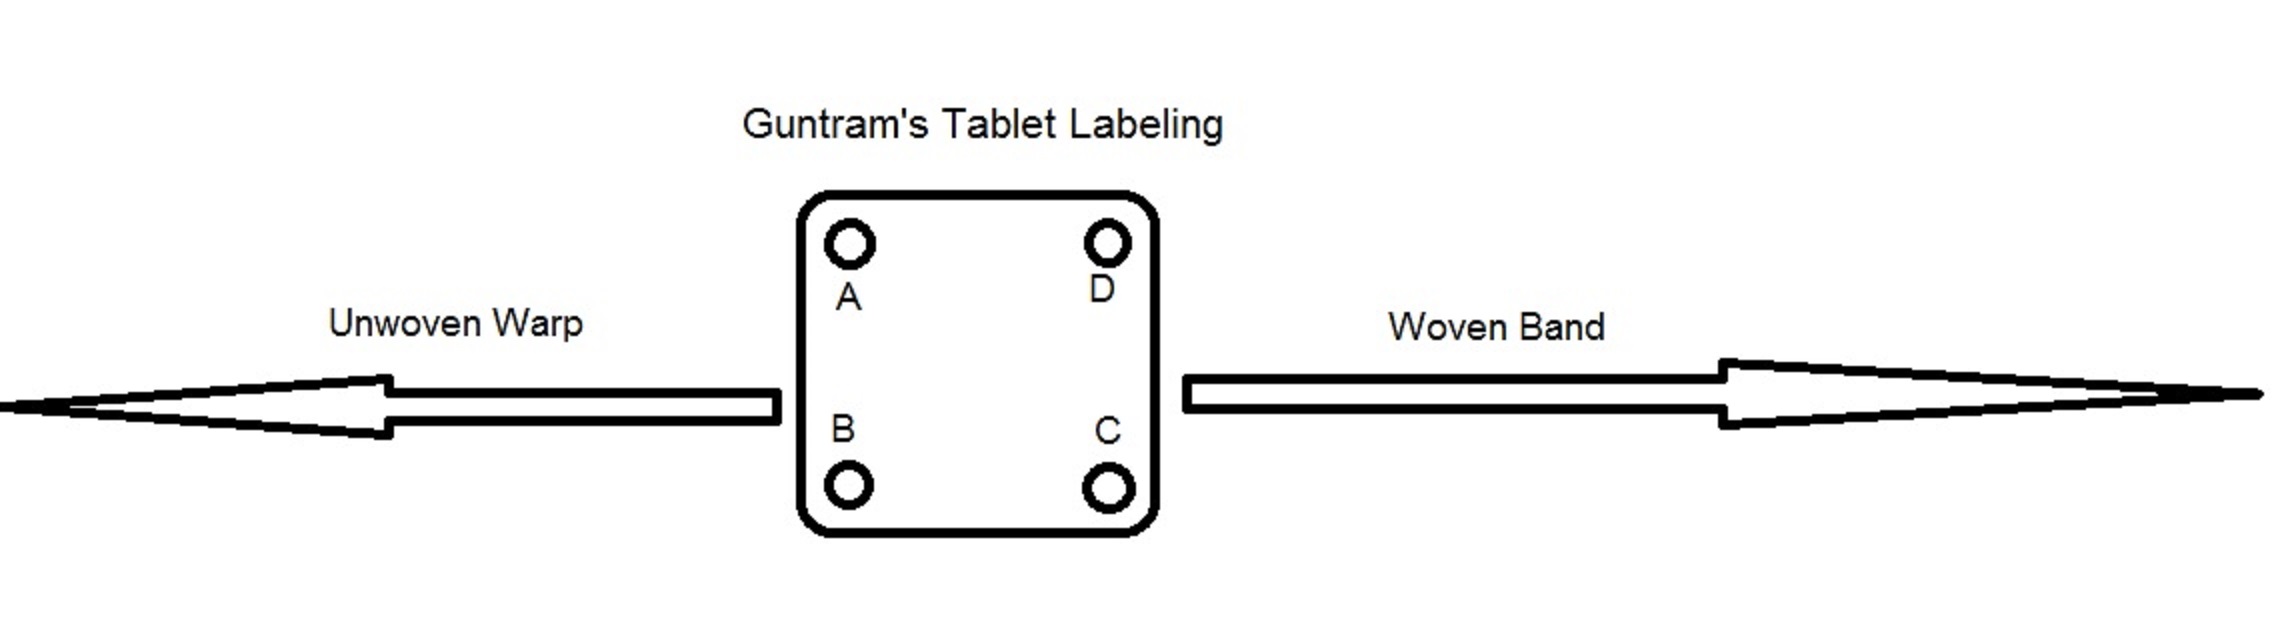
[notice]Note: Guntram labels his tablet weaving cards in an unusual way, which affects all patterns generated using his program GTT. From the GTT manual: “Due to some early misinterpretations I am using a rather counter-intuitive method, with holes labelled in a counter-clockwise direction.”
My rams horn pattern was designed in GTT and requires using Guntram’s unique threading system for the pattern to be woven successfully![/notice]
Weaving Instructions:
To begin thread your cards as indicated by the diagram below, being careful to use Guntram’s tablet labeling method. I found it is easier to have the odd cards be one color, and the even cards be a second color, but this is optional.

Starting threading and pack location

A different pattern woven in the pack idling style. The dark cards form front pack , and the light cards form the back pack. For the weft to secure the selvages correctly on this particular pattern, the left-most light card needed to be woven as part of the dark pack
Separate the cards so that the odd cards form a pack at the front of the weaving and the even cards form a second pack at the back. The 29th card is the same color as the other odd cards, but starts in the even pack. This is important for the 29th card to be woven correctly.
Pack idling patterns with an odd number of cards need special handling of the first and last cards to ensure that they are woven correctly.
It is also important that the weft be moving in the correct direction when you start weaving. You want the edge card to rotate on the side that the weft turns 180°. Otherwise the weft does not catch the warp on the first or last card, and you wind up with twisted cables that run parallel to your band, but are not connected.
[important]
Insert weft from right to left <———————
Turn the Odd Pack 1/4 turn (twists card 1 around the weft, securing it)
Weft from left to right ————–>
Turn the Even Pack 1/4 turn (twists card 29 around the weft, securing it)
[/important]
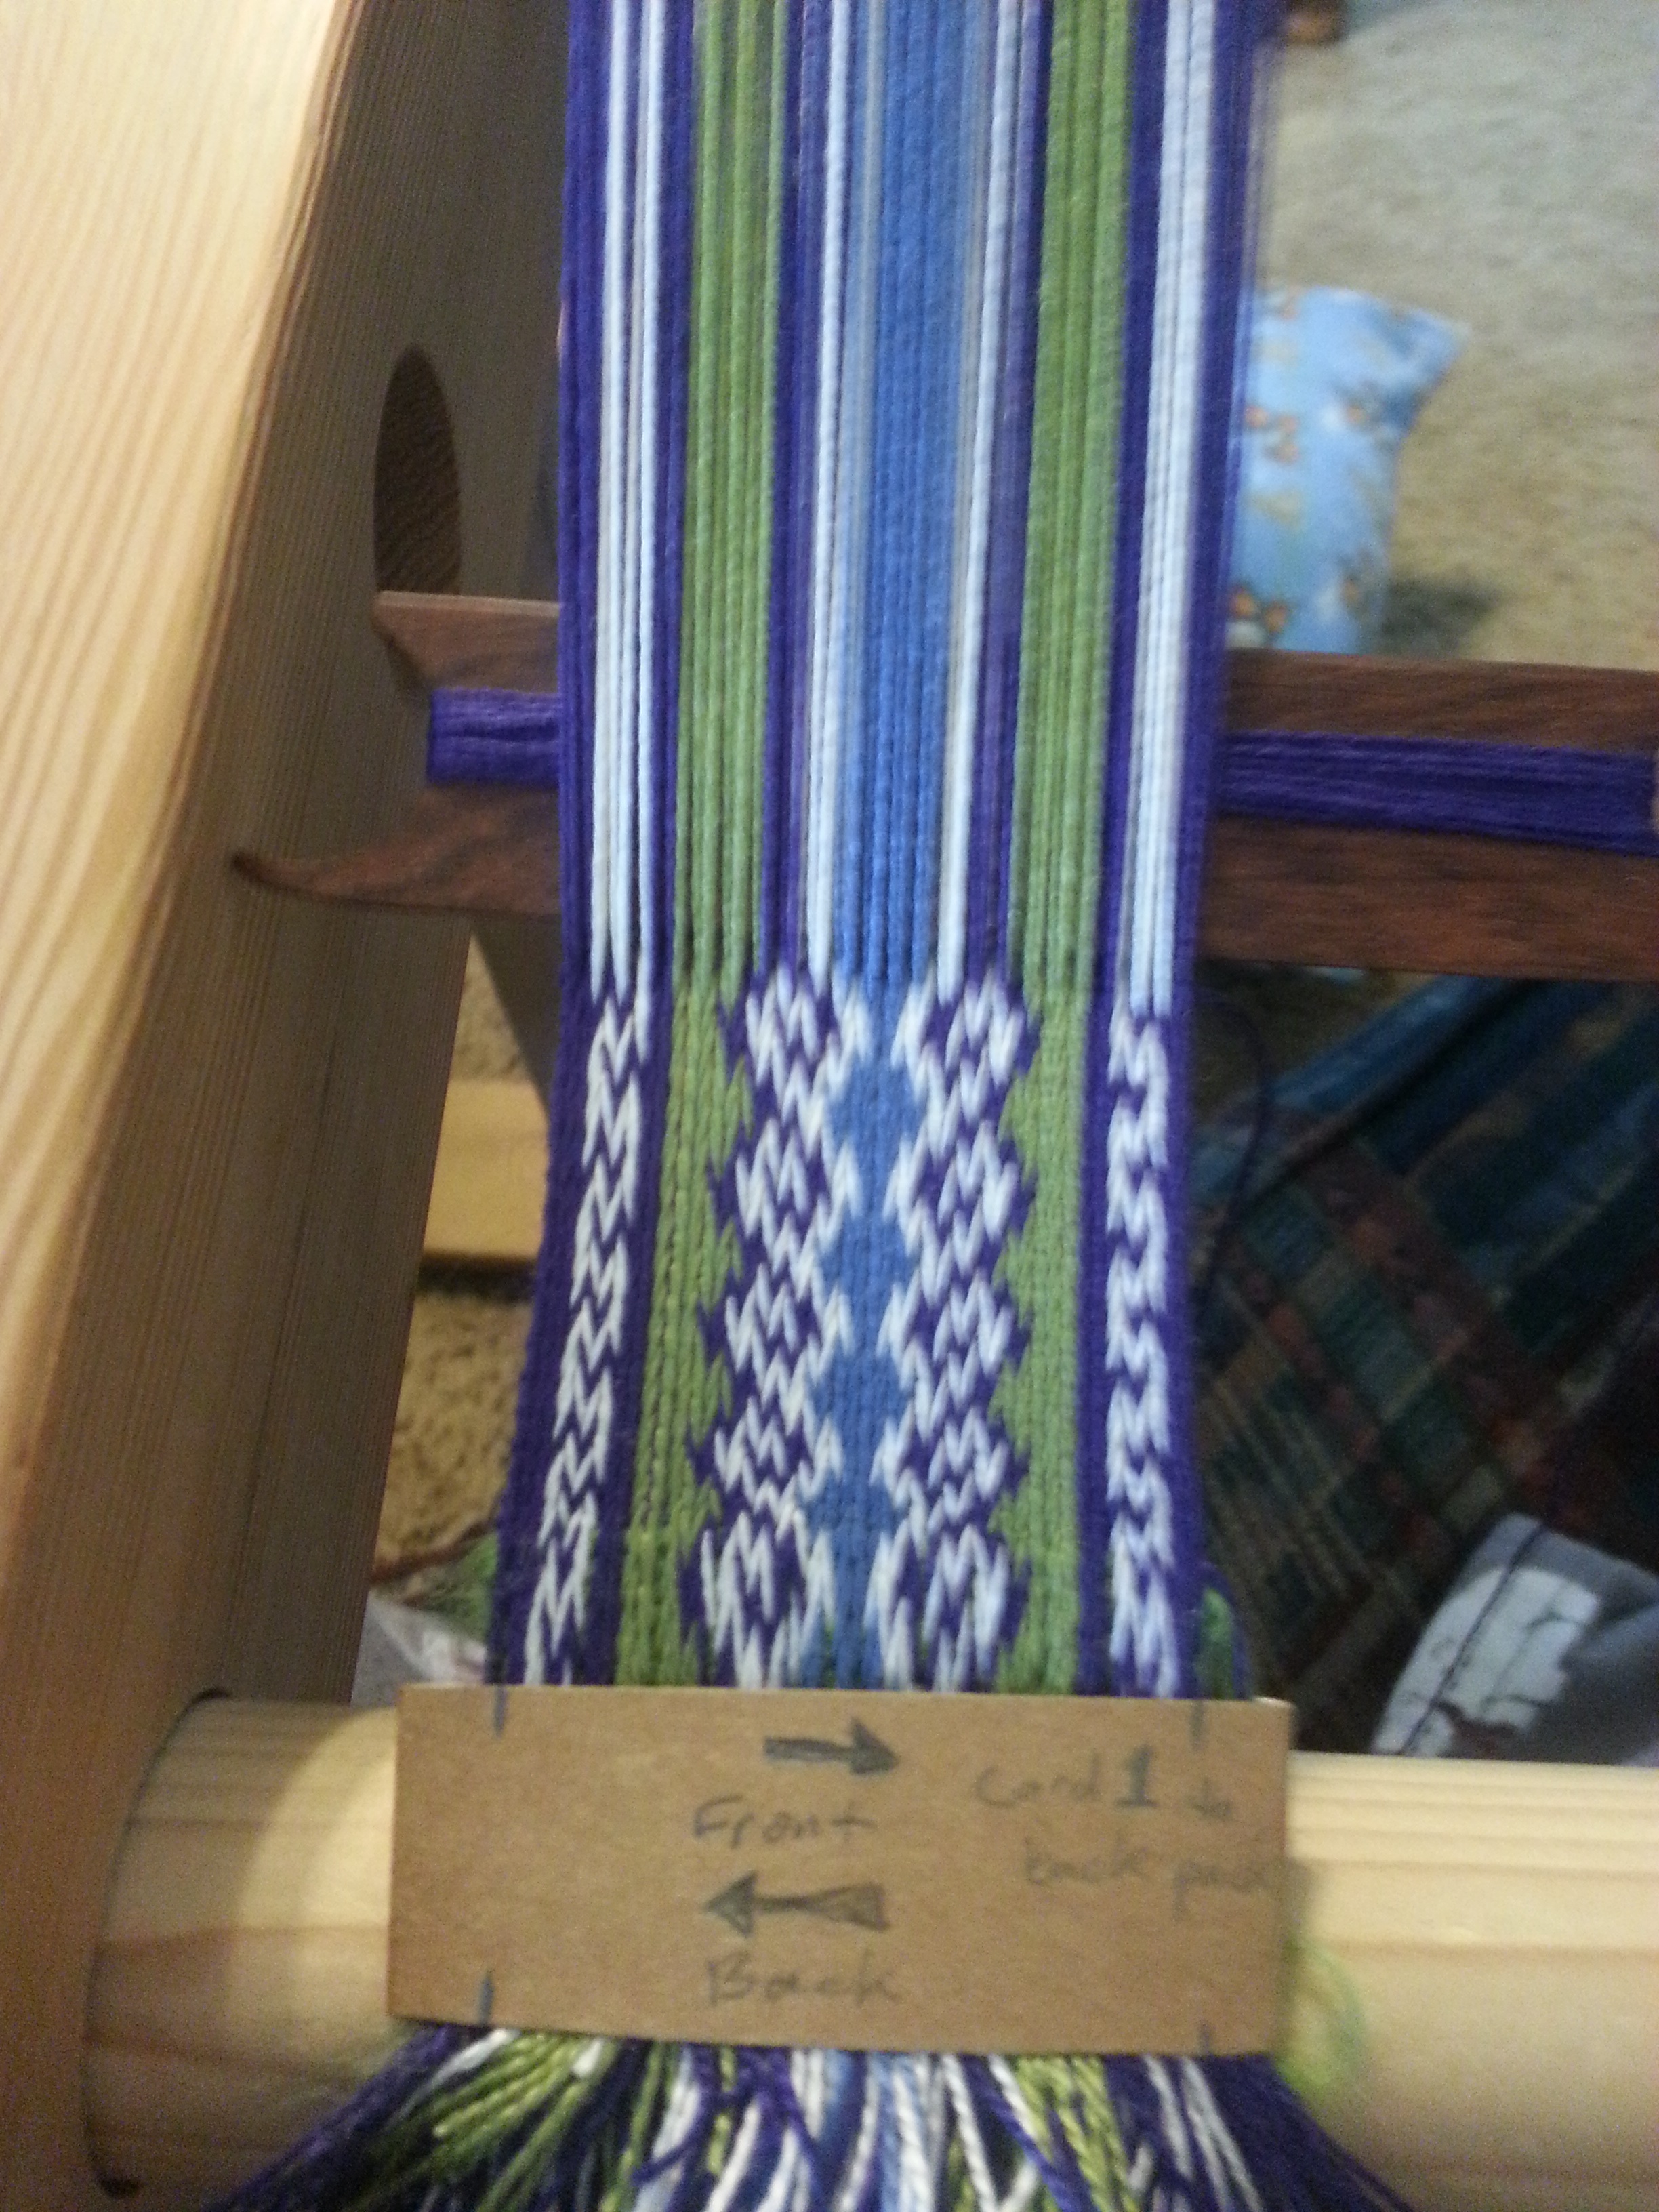
High Tech Gauge and Sequence Reminder on a different pattern – Example only! Use the directions in green box above for your band or it will not weave correctly!
I wrote the weaving sequence steps on a strip of thin cardboard. I then folded the ends of the strip around the band I had already woven, and taped them together at the back. On the edge of the cardboard strip I marked the desired width of the band, and I made a note to one side about card 29 being with the even pack. I used this to remind myself which step was next and as a gauge to keep the width of my band even, sliding it forward as I wove. I found this cheap tool was so effective at keeping my band width even that I’ve used one for every band I’ve made since.
Note – In the picture to the left I used “Front” and “Back” to label my two packs, instead of Odd and Even, because I found it reduced my weaving errors. Also note that the directions in the picture to the left are for a different band will NOT work for starting this pattern. Please use the directions in the green box above!
Continue weaving, repeating the above sequence, until the built up twist becomes troublesome. You will now need to perform a reversal. Try to find a bit of uninterrupted time to do this for best results. Trust me.
1. Weave to the point you want to reverse at. I aim for where the center blue diamond is at it’s narrowest. Stop the end of a turning sequence.
2. Rotate all the tablets (both packs) around their vertical axis. Do this carefully so that warp threads do not get caught or cross over neighboring cards. S twist cards will become Z twist cards, and vice versa.
3. Return card 29 to the odd pack, slide card 1 to the even pack.
4. Create a new cardboard gauge with the weaving sequence below (I just twisted my cardboard gauge over and used the underside.) Be sure that the new width gauge is exactly the same width as the previous one. Trust me on this. You may also put a note to one side that card 1 should now be in the even pack. This note saved me from weaving faults several times.
5. Continue weaving, following the new weaving sequence below:
[important]
Insert weft from right to left <———————
Turn the Even Pack 1/4 turn (twists card 1 around the weft, securing it)
Weft from left to right ————–>
Turn the Odd Pack 1/4 turn (twists card 29 around the weft, securing it)
[/important]
If you have a really long warp you may need to do another reversal or two. If twist builds up again find a stopping point at the end of a weaving sequence and some uninterrupted time. Rotate all cards on their vertical axis. Move card 29 and card 1 (they should never be in the same pack when you are weaving). Switch weaving to the other weaving sequence. Continue weaving, checking for faults.
Tips:
It is important to use a smooth thread with fairly high twist for the warp. I recommend using the same type of thread for all the warps to minimize frustration. I used 2/20 silk for all the bands pictured in this article. Smooth cotton is also an excellent choice for trouble-free weaving. Linen and wool are more appropriate for medieval bands but they can be trickier to use. I recommend you build experience using these sticker warps on simpler bands before attempting wool or linen on this pattern.
The pack idling structure is thicker and narrower than traditional tablet weaving, which needs to be factored in when planning your project. This weave tends to be stiff and makes great belts and straps. I used silk and beat gently to get a trim suitable for a wool coat, but this wouldn’t have been supple enough to work as trim on a finer fabric.
I strongly recommend placing the threaded cards on a tablet weaving loom or other device to maintain even tension. This allows you to let go of the idling pack without the pack becoming disorganized (as long as you are careful) and will make weaving much easier.
The pack idling style of weaving can be very frustrating if all warp threads are not the exact same length and tension. I use a fluffy yarn for weft for the first few picks to help even out any minor tension issues, then switched to a weft that matched my edge warp. In the picture above you can just see the bulky green starter weft distorting the first rams head motif.
If your cardboard width gauge slides around and annoys you use a paperclip to hold it in place. Make sure the wire ends of the paperclip are smooth, or they can snag your weaving. Avoid using something with more squeeze, like a binder clip, because it can distort your warp and create unevenness in your band.
Each complete motif is 8 picks, or four weaving sequences. It is easiest to stop weaving at the end of a weaving sequence. That way you always know where to start weaving when you begin next time.
It is very important to turn the packs in the correct sequence. If you skip a turning step (i.e. odd pack, even pack, even pack) the pattern will be off for the duration of the band until you correct it. There are two ways to correct weaving faults. If it is very early in the band it may be easiest to rearrange ALL the cards to their original threading position and start weaving fresh. This will result in a break in the pattern, but if done correctly will resolve any problems, assuming the threading is correct. The alternative is to unweave the band pick by pick until the fault is removed and then resume weaving normally. This is more time consuming, but prevents a break in the pattern.
When you first start weaving after a reversal you may find that some warp threads are caught on neighboring cards. Be careful as you adjust these errant threads. It is very easy to get the cards out of order. My cards were not labeled with numbers, and I had some trouble with this. Be careful to follow the new weaving sequence, as you will by habit want to return to the old one. Pay special attention to the band after a reversal to make sure the pattern is being woven correctly and to catch any faults early.
I found that reversals were tricky and slowed me down a great deal. This was my number one source of weaving errors. I found I could weave much faster if I eased twist along the warp to avoid reversals. Dealing with the built up twist took time, but correcting weaving errors was much much slower. To give you an idea of the lengths I was willing to go to avoid a reversal – In the seven yard band I made for Kolskegg’s coat I used just three reversals.
Bibliography:
Collingwood, Peter. The Techniques of Tablet Weaving. Robin & Russ Handweavers, Inc. 2002. p. 121.
Gartz, Eckhard. “Guntram’s Tablet Weaving Page.” http://www.guntram.co.za/tabletweaving/
Lewins, Shelagh. “Anglo-Saxon Belt Weaving Instructions.” http://www.shelaghlewins.com/tablet_weaving/saxon_belt/saxon_belt.htm
Priest-Dorman, Carolyn. “A Saxon Threaded-In Tablet Weave.” 1990,1997. http://www.cs.vassar.edu/~capriest/saxontw.html
Rogers, Penelope Walton. Cloth and Clothing in Early Anglo-Saxon England. York: Council for British Archaeology. 2007. p. 125.
Spies, Nancy. Ecclesiastical Pomp & Aristocratic Circumstance: A Thousand Years of Brocaded Tabletwoven Bands. Arelate Studio, 2000.
Copyright © 2013 Melanie A. Thompson
Permission is granted to make and distribute verbatim copies of this document for non-commercial use provided the copyright notice and this permission notice are preserved on all copies.